
Fashion
Neon 80s Outfits: Bold Fashion Trends For A Retro Vibe

The 1980s were a decade defined by excess, boldness, and a vibrant color palette that left an indelible mark on the world of fashion. Among the standout trends of this era were neon outfits—bright, electric hues that captured the spirit of fun, rebellion, and self-expression. Today, the neon 80s aesthetic is making a powerful comeback, offering a nostalgic yet modern twist to contemporary wardrobes. Whether you’re attending an 80s-themed party, incorporating retro pieces into your daily outfits, or simply paying homage to this iconic decade, neon 80s fashion remains a dynamic and eye-catching choice.
TRENDING
30 Hilarious Basket Puns To Add Fun To Your Day
The Rise Of Neon In The 80s
The emergence of neon in the 80s was driven by a collective shift towards experimental fashion. Television shows, music videos, and celebrities like Madonna, Prince, and Cyndi Lauper embraced bright colors and bold patterns, setting the tone for a decade where standing out was the ultimate goal. Neon was everywhere—from workout gear to evening wear—and it symbolized confidence, creativity, and a rejection of the muted tones that dominated previous eras.
Key Elements Of Neon 80s Outfits
Bright and Bold Colors
Neon fashion revolved around highlighter hues such as lime green, hot pink, electric blue, and fluorescent yellow. These colors were often worn in combination, creating head-to-toe neon ensembles that were impossible to ignore.
Layering and Mixing
Layering was essential in 80s fashion. Neon tank tops were worn over long-sleeve shirts, and leggings were paired with oversized sweaters or crop tops. Mixing patterns and textures was also a hallmark of the style, adding to the eclectic, anything-goes vibe of the era.
Accessories
No 80s outfit was complete without accessories. Chunky plastic bangles, oversized hoop earrings, scrunchies, and fanny packs in neon colors were must-haves. Sunglasses with bright frames and visors added the finishing touches to any look.
Footwear
Neon sneakers, leg warmers, and high-top shoes were iconic elements of 80s fashion. Footwear was often just as bright and bold as the rest of the outfit, tying the look together in a cohesive, vibrant way.
How To Recreate Neon 80s Outfits Today
Start with Statement Pieces
Incorporate one or two neon items into your outfit to make a bold statement without overwhelming your look. A neon jacket, skirt, or pair of leggings can serve as the centerpiece of your ensemble.
Balance with Neutrals
To modernize the neon look, pair bright pieces with neutral tones. A neon blazer over a black dress or a fluorescent top with white jeans strikes a balance between retro and contemporary.
Layering for Effect
Embrace the 80s love for layering by combining neon tank tops with mesh shirts or pairing a bright windbreaker with distressed denim. This approach allows you to play with different textures and colors.
Accessorize Smartly
Add a touch of neon through accessories like earrings, belts, or sunglasses. These small pops of color can bring an outfit to life without overpowering it.
80s Neon Outfit Ideas
Workout Glam
Pair neon leggings with an oversized sweatshirt and leg warmers. Complete the look with chunky sneakers and a high ponytail wrapped in a scrunchie.
Club Ready
Choose a neon bodycon dress with matching heels and bold jewelry. Layer with a leather jacket for an edgy twist.
Casual Cool
Wear neon biker shorts with an oversized white t-shirt and neon sneakers. Add a fanny pack and sunglasses for that laid-back, 80s-inspired vibe.
Office Chic
Brighten up your work wardrobe by pairing a neon blazer with a simple pencil skirt or trousers. Keep accessories minimal to let the neon piece shine.
Why Neon 80s Fashion Is Making A Comeback
Fashion is cyclical, and the return of 80s neon outfits reflects a broader trend of nostalgia-driven styles. The boldness and playfulness of neon resonate with modern audiences looking to break free from minimalist fashion. Additionally, the digital age’s obsession with Instagram-worthy outfits lends itself perfectly to the eye-catching nature of neon.
Where To Buy Neon 80s Outfits
Vintage Shops – Authentic 80s pieces can often be found in thrift stores and vintage shops.
Online Retailers – Websites like Etsy, ASOS, and Dolls Kill offer modern takes on 80s neon fashion.
DIY – Customize your wardrobe by adding neon patches, dyeing clothes, or accessorizing with bright pieces.
Tips for Rocking Neon with Confidence
Own the Look – Confidence is key when wearing neon. Stand tall and embrace the boldness of your outfit.
Keep it Fun – Neon fashion is all about having fun and expressing yourself. Don’t be afraid to experiment.
Know Your Shades – Certain neon colors may complement your skin tone better than others. Try different hues to see what works best for you.
FAQs
What is neon 80s fashion?
Neon 80s fashion refers to the bold, bright, and fluorescent clothing and accessories popular during the 1980s. This style features vibrant colors like hot pink, electric blue, and lime green, often layered and combined with eclectic patterns.
How do I style a neon 80s outfit for a party?
For an 80s-themed party, consider pairing neon leggings with an oversized sweatshirt, accessorized with chunky jewelry, leg warmers, and bright sneakers. A neon headband or scrunchie completes the retro look.
Can I wear neon 80s fashion casually today?
Yes! Modernize neon 80s fashion by incorporating a single neon piece into your outfit, such as a jacket or shoes, paired with neutral items like jeans or a plain t-shirt.
Where can I find neon 80s accessories?
Look for neon accessories at vintage shops, online retailers, and specialty stores. Brands like ASOS and Dolls Kill often carry retro-inspired pieces.
Why is neon associated with the 80s?
Neon became popular in the 80s as part of the decade’s larger-than-life aesthetic. Influenced by pop culture, music videos, and fitness trends, neon symbolized individuality and the vibrant, carefree spirit of the time.
In the ever-evolving world of beauty and nail care, new trends pop up all the time, promising longer-lasting, more stylish nails. One of the most exciting and talked-about trends in recent years is Gel X. If you’ve been scrolling through Instagram, Pinterest, or your favorite nail salon’s portfolio, you’ve probably seen the term “Gel X” pop up quite a bit. But what exactly is Gel X’s and why is it quickly becoming a favorite among nail enthusiasts?
This guide will break down everything you need to know about Gel X—from what it is, how it’s applied, to why it’s such a popular choice for a nail upgrade. Whether you’re a nail newbie or a beauty aficionado looking to try something new, this simple guide will help you understand why Gel X’s is more than just a trend—it’s a game-changer in the nail industry.
TRENDING
Top Pokemon Emerald Cheats You Need To Try Today
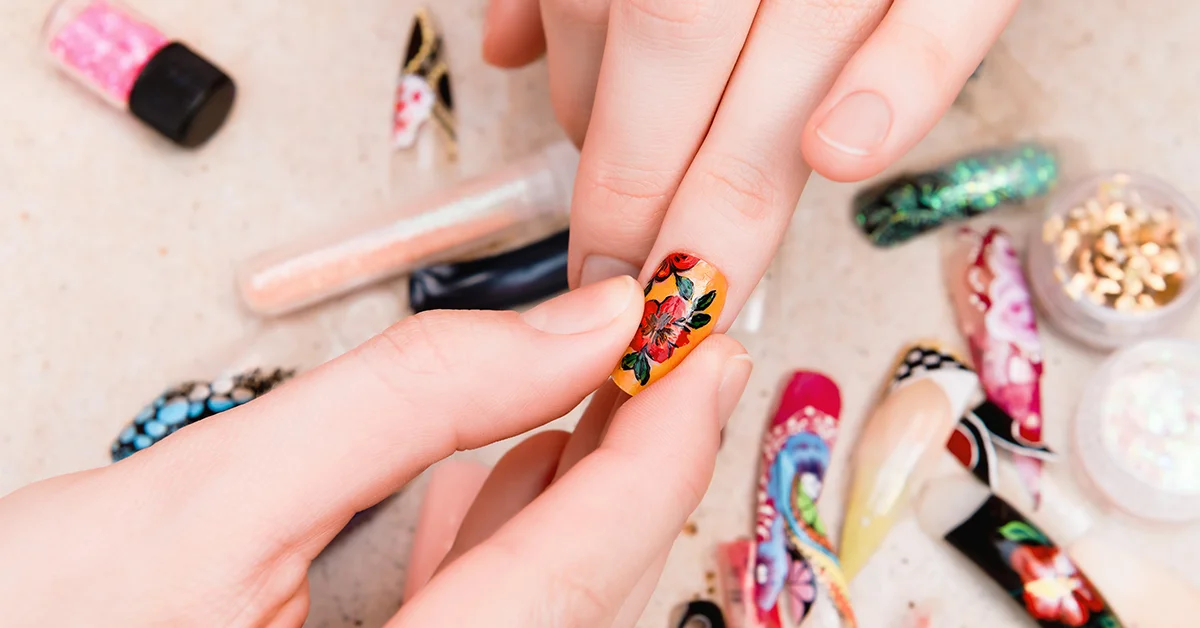
What Is Gel X?
At its core, Gel X is a type of nail extension system that combines the best qualities of gel polish and nail tips to give you strong, natural-looking nails with a beautiful finish. Unlike traditional acrylic or hard gel nails, Gel X’s uses soft, flexible gel tips that are pre-shaped and pre-designed to fit your natural nails perfectly. These tips are applied using a gel adhesive and then cured under a UV or LED light to create a durable, glossy finish.
The result? Nails that are lightweight, comfortable, and less damaging than some traditional nail extension methods. The gel tips also provide a smooth surface that can be painted or decorated just like natural nails, making Gel X’s both practical and fashionable.
How Does Gel X Differ From Other Nail Enhancements?
If you’ve ever gotten acrylics or gel extensions, you might wonder what sets Gel X’s apart. Here’s a quick comparison:
-
Acrylic Nails: Acrylics are a mixture of liquid monomer and powder polymer that harden into a sturdy nail overlay. They are durable but can be harsh on your natural nails and may require frequent fills.
-
Hard Gel Nails: Hard gel nails are sculpted directly onto your natural nail or forms using a gel that hardens under UV/LED light. They feel lighter than acrylics but can be tricky to remove.
-
Gel X: Gel X tips are pre-made soft gel extensions. They’re applied with a gel adhesive and cured under UV/LED light. Because the tips are pre-shaped and softer, Gel X nails are more flexible and tend to be less damaging, with a natural feel.
One key advantage of Gel X is the ease of application and removal compared to acrylics or hard gels. The pre-made tips reduce the time your nail technician needs to sculpt nails, and when it’s time to remove, Gel X nails can be soaked off similarly to gel polish without aggressive filing or drilling.
The Benefits Of Choosing Gel X Nails
If you’re thinking about trying Gel X, it’s helpful to know why so many people are switching to this method. Here are some of the biggest benefits:
Natural Look and Feel
Because the tips are made from a soft gel material, they blend seamlessly with your natural nail bed and move flexibly with your nail. This gives a more natural look and feel compared to traditional acrylics, which can sometimes look thicker or feel stiff.
Lightweight and Comfortable
Gel X nails are notably lighter than acrylic nails or other enhancements. This makes them more comfortable for everyday wear and less likely to cause nail fatigue.
Long-lasting and Durable
Despite being lightweight, Gel X nails are very durable. They’re resistant to chipping and breaking, lasting anywhere from two to three weeks before needing a fill or removal. This makes them a great option for people who want long-lasting beauty without frequent salon visits.
Healthier for Your Natural Nails
Gel X is generally less damaging than acrylics because there’s no harsh chemicals or powders involved, and removal is gentler. The soft gel tips protect your natural nails rather than compromise them.
Versatility in Nail Design
The smooth surface of Gel X tips is ideal for nail art, polish, and even stamping. Whether you want a simple nude look or an elaborate design, Gel X nails provide a perfect canvas.
The Gel X Application Process: What To Expect
If you’re curious about how Gel X nails are done, here’s a simple overview of the typical salon procedure:
Preparation
Your nail technician will start by cleaning and shaping your natural nails, gently pushing back cuticles and removing any oils or debris to ensure the gel adhesive bonds properly.
Selecting the Tips
Next, they’ll select the Gel X tips that fit your nail size and shape perfectly. These pre-shaped tips are designed to match natural nails closely, so the fit looks seamless.
Application
The technician applies a gel adhesive to the tip and carefully places it onto your natural nail. Once positioned, your nails go under a UV or LED lamp to cure the gel and bond the tip securely.
Shaping and Buffing
After curing, the nails are gently filed and buffed to perfect the shape and smooth out any edges, ensuring a flawless finish.
Polish and Design
Finally, your nails are polished with gel polish or decorated with nail art, then cured one last time under the lamp for a shiny, durable finish.
How To Care For Gel X Nails
Like any nail enhancement, proper care will help your Gel X nails last longer and stay looking great. Here are some tips:
-
Avoid Excessive Water Exposure: Try to keep your nails dry as much as possible, as prolonged water exposure can weaken the adhesive.
-
Wear Gloves for Chores: When doing housework or gardening, gloves protect your nails from harsh chemicals and physical damage.
-
Moisturize Cuticles: Keeping your cuticles hydrated prevents dryness and helps maintain the health of your natural nails.
-
Don’t Use Nails as Tools: Avoid prying or opening things with your nails to reduce the risk of lifting or breaking.
-
Schedule Regular Fills: After 2-3 weeks, visit your nail technician for fills to keep your nails looking fresh and prevent damage.
Removing Gel X Nails Safely
One of the major advantages of Gel X is the relatively easy and safe removal process. Unlike acrylics, which often require heavy filing, Gel X tips can be soaked off using acetone or a gel polish remover.
Here’s a basic removal guide:
File the shiny top layer of the nail to break the seal.
Soak a cotton ball in acetone and place it on the nail.
Wrap the nail with foil to keep the cotton in place.
Leave it for 10-15 minutes.
Gently slide off the softened gel tip with a cuticle pusher.
Always have removal done by a professional to avoid damage to your natural nails.
Who Is Gel X Best For?
Gel X nails are ideal for:
-
People who want a natural-looking nail extension without the weight or harsh chemicals.
-
Those who prefer a quick application and removal process.
-
Anyone who enjoys changing nail designs frequently but wants a durable base.
-
People with naturally weak or brittle nails looking for a healthier enhancement.
-
Busy individuals who want low-maintenance nails that last.
Final Thoughts
If you’re seeking a trendy, long-lasting nail upgrade that combines beauty, comfort, and nail health, Gel X nails are definitely worth considering. Their natural look, lightweight feel, and durability make them a standout choice for anyone who loves keeping their nails polished and perfect.
Before booking your appointment, consider discussing your nail goals with a certified technician who can recommend the best shape and style for your hands. With proper care and regular maintenance, Gel X can give you beautiful, salon-quality nails for weeks, helping you keep your hands looking fresh and fabulous.
ALSO READ: Is Olive Oil A Seed Oil? Here’s What You Need To Know
FAQs
What is Gel X?
Gel X is a nail extension system that uses soft, pre-shaped gel tips applied with gel adhesive and cured under UV/LED light, offering a lightweight, natural-looking, and durable alternative to traditional acrylic or hard gel nails.
How long do Gel X nails last?
Gel X nails typically last between two to three weeks before needing a fill or removal, depending on how well you care for them and your nail growth.
Is Gel X nail application painful?
No, Gel X application is painless. It involves no drilling or harsh chemicals and feels similar to a gel polish application.
Can I remove Gel X nails at home?
While it’s possible to remove Gel X nails at home with acetone soak, it’s safest to have them removed by a professional to avoid damaging your natural nails.
Are Gel X nails healthier than acrylics?
Generally, yes. Gel X nails are less damaging because they use softer gel tips and a gentler removal process, helping protect the natural nails underneath.

Shopping for mens golf shorts seems straightforward until you make a few expensive mistakes and realize how many details matter. Over the years, I’ve bought shorts that were too long, too short, wrong colors for my home course, and made from fabrics that felt like sandpaper after one wash. Talking with other golfers, these same mistakes come up repeatedly – we all seem to learn the hard way about golf shorts selection. Understanding these common pitfalls can save you money, embarrassment, and discomfort on the course while helping you build a versatile golf wardrobe that actually works for your game and lifestyle.
Ignoring Length and Proportions
The most common mistake is buying shorts that are either too long or too short for your body type and the golf setting. Shorts that hit at or below your knee look dated and can restrict your hip turn during swings. Meanwhile, shorts that are too short might violate dress codes and can look inappropriate, especially at traditional clubs.
Many golfers assume their casual short size will work for golf shorts, but golf-specific cuts often run differently. Athletic cuts accommodate larger thighs but might look baggy if you have a slimmer build. The inseam length that works for beach shorts rarely translates well to golf settings.
Body proportions matter significantly when choosing short length. Shorter golfers need to be more careful about inseam length – what looks proportionate on a 6-foot golfer might look like knee-length shorts on someone who’s 5’6″. Conversely, very tall golfers often need longer inseams to achieve the same proportional look.
Choosing Poor Quality Fabrics
Cheap golf shorts often use fabrics that feel uncomfortable, look unprofessional, or fall apart quickly. Cotton-polyester blends without stretch feel restrictive during swings and don’t wick moisture effectively. Pure cotton shorts, while comfortable initially, tend to wrinkle easily and retain sweat during hot rounds.
Fabric weight makes a huge difference in both appearance and comfort. Shorts that are too lightweight might be comfortable but look cheap and wrinkle easily. Heavy fabrics might look substantial but can be uncomfortable in hot weather and restrict movement during play.
Many golfers overlook the importance of stretch fabric in shorts. Without adequate elastane or spandex content, shorts can bind during your backswing or feel tight when sitting in a golf cart. Even 2-3% stretch content makes a significant difference in comfort and mobility.
Pay attention to fabric care requirements. Some golf shorts require special washing instructions or dry cleaning, which becomes expensive and inconvenient over time. Choose shorts that can handle regular machine washing without losing their shape or color.
Overlooking Course Dress Codes
Different golf courses have varying dress code requirements that affect short selection. What’s acceptable at a casual municipal course might be inappropriate at a private country club. Many golfers make the mistake of buying shorts without considering where they’ll primarily be playing.
Color restrictions vary significantly between courses. Some clubs prohibit bright colors, patterns, or certain color combinations. Others have specific requirements about short length or style. Research your home course’s dress code before investing in new golf shorts.
Seasonal dress code changes catch many golfers off guard. Some clubs don’t allow shorts during certain months or have different requirements for tournament play versus casual rounds. Understanding these variations prevents awkward situations and wasted purchases.
Guest policies at other courses can be stricter than your home club. If you travel for golf or play as a guest at other facilities, choose shorts that meet the most conservative dress codes to avoid embarrassment or having to purchase emergency clothing at the pro shop.
Sizing and Fit Issues
Many golfers buy golf shorts based on their casual clothing size without considering the different fit requirements for athletic activities. Golf shorts need to accommodate your swing motion while maintaining a professional appearance, which requires different proportions than casual shorts.
Waist sizing in golf shorts often runs differently than other clothing. Some brands run large, others run small, and the rise height affects how the waist measurement translates to actual fit. Always check brand-specific sizing charts rather than assuming your usual size will work.
Thigh and seat measurements become crucial for golf shorts since you need freedom of movement during your swing. Shorts that fit properly in the waist might be too tight in the thighs, restricting your hip turn and follow-through. This is especially important for golfers with athletic builds.
Trying on shorts while standing doesn’t reveal all fit issues. Test your range of motion by doing practice swings, sitting down, and walking around. Golf shorts that feel fine while standing might bind or restrict movement during actual play.
Neglecting Seasonal Considerations
Buying shorts without considering when and where you’ll wear them often results in poor choices. Lightweight shorts perfect for summer play might be too thin for spring and fall rounds when temperatures are cooler or winds are stronger.
Color choices should reflect seasonal appropriateness. Dark colors absorb more heat in summer, while light colors might not provide enough warmth during cooler months. Consider building a seasonal rotation rather than trying to find one pair that works year-round.
Weather resistance varies significantly between golf short styles and prices. Shorts without any water resistance become uncomfortable during morning rounds with heavy dew or unexpected light rain. However, shorts with too much weather protection might be unnecessarily warm in hot climates.
Storage and travel considerations affect seasonal purchases. Golfers who travel to different climates need versatile shorts that work in various conditions, while those who play primarily in one climate can optimize for specific conditions.
Focusing Too Much on Price
Bargain hunting for golf shorts often leads to poor quality purchases that don’t last or perform well. Extremely cheap shorts typically use inferior fabrics, poor construction, and inadequate design for golf activities. The money saved initially gets lost when you need to replace them quickly.
Conversely, assuming expensive shorts are automatically better can lead to overpaying for features you don’t need. Some premium golf shorts include advanced technologies that provide minimal benefit for casual golfers or specific climate conditions you’ll never encounter.
Sale shopping without considering actual needs often results in buying shorts in wrong sizes, colors, or styles simply because they were heavily discounted. Focus on getting the right product at a good price rather than just the lowest price available.
Fashion
Unseen Makeover: How Thoughtful Re-Labeling of Apparel Becomes a Powerful Catalyst for Elevating Your Brand and Capturing New Audiences

Understanding Re-Labeling
In the competitive fashion industry, brands are constantly searching for new ways to stand out. One highly effective method is re-labeling clothing—removing the original manufacturer’s tags and replacing them with your own. This subtle yet strategic move enables brands of all sizes to offer uniquely curated experiences that deliver a strong message to consumers.
By opting for Custom T Shirt Labels, brands can tailor every aspect of the customer experience, starting with a garment’s most basic identifier: its label. This not only cements your brand identity the moment a shopper sees or feels the tag, but also creates fresh opportunities for engagement, loyalty, and market differentiation.
Legal Considerations
Legal compliance is foundational in the re-labeling process. Always ensure original manufacturer tags are fully removed or covered to prevent trademark infringement or consumer confusion. Additionally, according to the Federal Trade Commission, relabeled garments must include accurate care information, fabric content, and country of origin information to comply with clothing labeling laws. Staying informed on these regulations is critical to avoid costly penalties and reputational damage.
Benefits of Re-Labeling
- Brand Identity: Custom branding unites your product line and reinforces the values you want your audience to connect with. When a customer picks up a shirt, your label signals professionalism, consistency, and uniqueness.
- Customer Loyalty: Strong labels build trust. Customers are more likely to make repeat purchases when they feel connected to a brand with a clearly defined identity.
- Market Differentiation: Distinctive labels help your products stand out, even in crowded marketplaces. This is especially critical for online retail and boutiques where first impressions make a dramatic impact.
Re-labeling even enables smaller brands or limited-edition lines to compete with much larger names, creating an elevated perception without extensive manufacturing investment.
Steps to Implement Re-Labeling
- Source Quality Products: Begin by selecting garments that reflect your brand values in terms of fabric quality, fit, and design. The clothing you choose sets the tone for what your label will represent.
- Design Custom Labels: Next, craft your labels to be visually captivating and compliant with all legal requirements. Incorporate your logo, care instructions, and country of origin in a professional format.
- Partner with Professionals: Collaborate with established re-labeling services or local print shops that have experience with custom apparel labels to ensure your vision is executed seamlessly.
- Quality Control: After re-labeling, inspect every garment for quality and brand consistency. Proper inspection ensures your products always meet consumer expectations and safeguards your reputation.
Challenges and Solutions
Quality Assurance
The main challenge in re-labeling lies in preserving garment quality during the relabeling process. Poorly attached or itchy tags can negatively impact the customer experience, so it is essential to partner with experienced providers and maintain robust quality checks.
Staying Compliant
Compliance with apparel labeling statutes and industry best practices can be a learning curve, especially for new brands. Staying updated on regulatory changes through official resources and consulting industry experts ensures ongoing compliance and protects your business.
-

 Entertainment1 year ago
Explore The Kristen Archives: A Treasure Trove Of Stories & More
-

 Business2 years ago
What is O Farming: How to Make Money Online and Its Start-Up Benefits
-

 Entertainment2 years ago
Sandra Orlow: Exploring the Life and Legacy of a Cultural Icon
-

 Law1 year ago
Protect Your Vehicle with These Smart Motor Insurance Strategies
-

 Technology2 years ago
Geekzilla Radio: Your Portal to the Ultimate Geeky Adventure!
-

 General2 years ago
Baby Alien Fan Bus: Watch Parts 2 & 3 on Twitter, Reddit!
-

 Fashion2 years ago
DIY Fashion: Customizing Your Black Homecoming Dress for a Personalized Touch
-

 General2 years ago
Diana Nyad & Bart Springtime: A Swim to Success